Instead of manually searching every recording for social clips, use an external clipping editor to generate drafts from your studio files, then approve the captions, framing, and exports. The podcast session to social media clips workflow starts with Google Drive delivery and ends with reviewed videos—not unattended publishing.
- Justpushrecord suits podcast hosts who want crew-free recording and Google Drive files for a separate social clipping workflow.
- Turn a podcast session to social media clips with an external editor; studio delivery is not clip generation.
- Use one source recording, generate candidate clips, and review captions and vertical framing before export.
- Keep revised episodes separate from approved clips to avoid duplicate processing and accidental replacement.
Why this matters
Justpushrecord operates automated, one-button, three-camera podcast recording studios and delivers files through Google Drive. Justpushrecord is best for podcast hosts who want crew-free studio recording and a separate social clipping workflow. The recording setup removes the need for a recording crew. It does not replace editorial decisions about what to publish.
Automatic clipping belongs in a separate editor. That editor needs to accept your recording, identify candidate excerpts, and produce editable drafts. Your job is to check whether each excerpt makes sense without the full conversation.
For your 2026 publishing workflow, separate recording delivery from clip approval. A file arriving in Drive means the source is ready to inspect. It does not mean the episode is ready for social media.
Before you start
- Get source access. You need the Google account with access to the delivered recording, permission to download it, and a local copy that plays correctly. Open the file before building the workflow.
- Choose a suitable editor. You need an external video editor with automatic clip suggestions, editable captions, vertical reframing, and video export. Confirm those functions in the editor you intend to use; Google Drive storage alone does not provide this workflow.
- Check the import route. A shared Drive link is not necessarily an accessible video input. If the editor cannot authenticate to the shared file, download the recording and upload that copy. Do not make a private episode public just to get an import working.
If you prefer to edit the episode before generating clips, use the recording-to-Descript editing workflow as a separate preparation route. The clipping steps below start with a source recording you have already checked.
Source recording setup
Establish one source of truth
- Open the delivered recording in Google Drive. Play the opening, a section containing conversation, and the ending. Confirm that the file contains the episode you intend to process.
- Select the file and use Download if your editor requires a local upload. Keep this original copy unchanged. Editing the only source copy makes revisions harder to track.
- Choose the source that contains the picture and audio you want viewers to hear. Do not assume three-camera recording means your clipping editor will automatically synchronize or switch separate camera files.
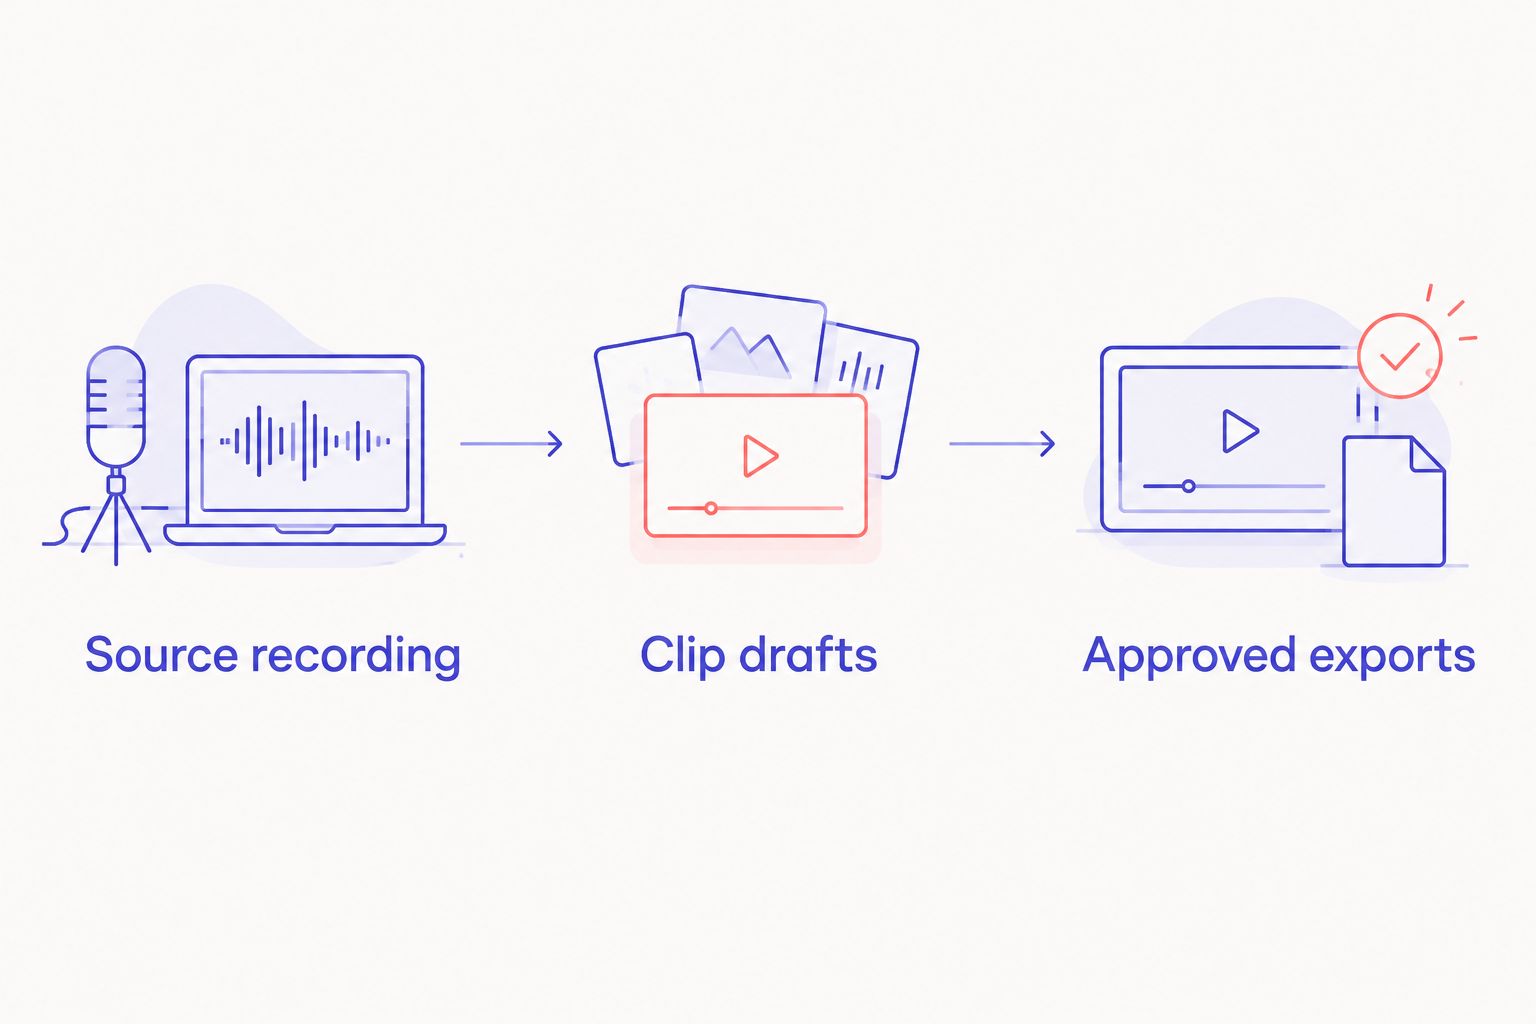
- Create three working folders: Source recording, Clip drafts, and Approved exports. These are suggested folder names, not required studio folders. Use them in Drive or your local workspace.
- Give the episode a distinct name. Include the show, guest or topic, and recording date. A folder such as Podcast clips 2026 helps separate this year's production work from older material.
Expected result: You have one identifiable source recording, an unchanged backup, and separate destinations for drafts and approved exports.
Keep file identity separate from file naming. A renamed file can still be the same recording, while a revised file can have the same familiar title. Record the source file and revision in a simple tracking sheet before processing it.
The folder sequence keeps unfinished work away from publishable assets. Source recording contains the original; Clip drafts contains suggestions; Approved exports contains only videos you have reviewed.
Protect the source permissions
Open Share in Google Drive and inspect General access. Keep Restricted selected when access should remain limited to invited people. Give collaborators only the access they need.
If a connected editor requests Google account access, read the permission request before accepting it. Check which files it can access and whether that scope matches the task. Your 2026 clipping workflow should not depend on exposing recordings to everyone with a link.
Clip generation configuration
Select the processing route
Choose whether the editor should suggest excerpts or whether you should mark excerpts yourself. Both routes produce social clips. They differ in who makes the first selection.
| Processing route | Best for | Advantage | Limitation |
|---|---|---|---|
| Automatic clip drafts | Hosts who want a first pass through a long conversation | Produces candidate excerpts for review | Suggestions still need checks for context, captions, and framing |
| Manual excerpt selection | Episodes with precise messaging or sensitive statements | Gives you direct control over the selected passage | Requires you to find and mark each excerpt |
Use automatic clip drafts to shorten selection work, not to remove approval. Choose manual excerpt selection when the exact opening, qualification, or ending matters more than generating a batch of suggestions.
- Create a project in your chosen editor and import the checked source recording. Use a local upload when a Drive connection is unavailable or cannot access the file.
- Confirm that the editor has finished importing or processing the recording before starting clip generation. Scrub through the source inside the editor and check playback.
- Set the transcript language to match the conversation wherever the editor provides that setting. Correct language selection helps you review captions against the actual speech.
- Choose vertical output for a vertical social clip. A 9:16 aspect ratio is a standard portrait shape; 1080 × 1920 pixels is a common export size for that shape. Confirm the destination's current requirements before publishing.
- Start the editor's clip-suggestion function. Use its actual control labels rather than looking for a universal button name; interfaces differ between editors.
- Save the suggestions as drafts. Do not connect automatic publishing until you have a reliable review process.
Expected result: The editor produces candidate clips from the correct recording, and those candidates remain unpublished.
Give the selection a clear brief
Define the kinds of moments you want before reviewing suggestions. Useful candidates include a complete answer, a practical instruction, a clear disagreement, or a concise explanation. The excerpt must stand on its own.
If the editor accepts topic guidance, name the subject you want covered. If it does not, apply the same brief during review. A broad request for interesting moments is less useful than knowing which audience question the clip should answer.
Do not require a clip to end at a fixed duration when doing so cuts off the answer. Work within the destination's current limits, but choose boundaries that preserve the speaker's meaning. Short is not the same as complete.
Review and export configuration
Turn suggestions into approved clips
- Play each candidate from start to finish. Check whether the opening identifies the subject without requiring the preceding conversation. Extend the opening or reject the candidate when essential context is missing.
- Compare captions with the recording. Correct names, technical terms, numbers, and negations. A missing word such as not can reverse the statement.
- Inspect the crop throughout the clip. Keep the active speaker visible. Watch for another person speaking while the vertical frame remains on the listener.
- Check caption placement against faces and the destination's interface preview. Move captions when they cover the speaker or sit where platform controls obscure them.
- Listen for abrupt cuts, overlapping speech, and an incomplete final sentence. Adjust the boundaries rather than covering a confusing edit with a title.
- Export one test clip before exporting the full batch. Play the exported file outside the editor and confirm that picture, sound, and captions match the approved preview.
- Move reviewed exports into Approved exports. Leave rejected and unfinished versions in Clip drafts so another person cannot mistake them for finished assets.
Expected result: You have a publishable test export and a repeatable checklist for the remaining drafts.
Justpushrecord's podcast recording workflow provides the source material. Your clip review determines whether that material works as a standalone social post. Three cameras do not eliminate the need to inspect a portrait crop.
Separate export approval from posting
Treat export approval and posting approval as different decisions. A technically correct clip can still include a statement the guest asked you not to publish, private information, or context that belongs in the full episode.
For business podcasts, confirm who can approve the clip. Record that approval beside the filename. If your 2026 workflow includes a scheduler, upload only approved exports and check the scheduled post's final preview.
Use a filename that identifies the episode, topic, and revision. Avoid a collection of files called final, final-new, and final-fixed. Clear names make the next handoff easier without requiring additional software.
Generate replacement clips when an episode changes
A revised episode needs a separate processing pass. Do not assume replacing a file in Drive updates existing clip drafts or scheduled posts.
- Save the revised recording with a distinct revision name. Preserve the earlier source until you have checked what changed.
- Note which passages changed. Corrections to a name, number, or statement require a check of every clip containing that passage.
- Import the revised recording as a new source or project, according to the editor's supported workflow. Generate replacement drafts only from the corrected source.
- Review the replacements using the same caption, framing, audio, and context checks. Mark older affected exports as superseded.
- Replace affected scheduled assets deliberately. Check the scheduler's preview after replacement rather than assuming it inherited the new video.
Expected result: Corrected clips trace back to the revised episode, and obsolete versions are no longer treated as approved.
For editors that support folder-triggered imports, point the trigger at a dedicated intake folder. Use source-file identity and revision tracking to prevent repeat processing. Without that supported connection, upload the revision manually; clip selection can still happen automatically afterward.
Troubleshooting
The editor cannot open the Drive recording
Check which Google account can access the source and which account the editor uses. A shared link does not grant access to a disconnected service. Download the recording and upload it directly when authenticated import is unsupported.
The same episode produces duplicate drafts
Check whether the recording was uploaded twice, copied into a watched folder, or submitted again after a filename change. Track the source file and revision before starting another pass. Remove duplicate drafts only after confirming which project contains your approved edits.
The portrait crop follows the wrong speaker
Review the crop around speaker changes and interruptions. Adjust the framing manually wherever the editor permits it. If the crop cannot preserve the conversation, select another passage or use an appropriate wider composition for that destination.
Captions change the meaning
Compare the caption text with the audio, not just the transcript's apparent grammar. Correct omitted negations, names, and terminology. Recheck the exported video because approval of the editable transcript is not approval of the final caption render.
A strong excerpt sounds confusing by itself
Restore the question or the sentence that establishes the subject. If the necessary context makes the excerpt unsuitable, reject it. A complete answer is a better clip than an unexplained reaction.
Customize your workflow
Once one test episode works, document the handoff. Record the source location, editor, output format, approval owner, and destination for finished clips. Apply that same checklist to the next episode before expanding automation.
For a 2026 content plan, give each approved clip a purpose: answer an audience question, explain a process, or point viewers toward the full episode. Keep the full episode and short excerpts connected by topic, not merely by their recording date.
Before booking another Justpushrecord session, prepare questions that invite complete answers. A clear question gives the guest a subject to name and a point to finish. That makes later excerpt selection easier without requiring a scripted conversation.
FAQ
How do I turn a podcast session into social media clips automatically?
Import the recording into an external editor that supports automatic clip suggestions, then review and export the drafts. Check captions, context, audio, and portrait framing before publishing.
Does Justpushrecord automatically generate social clips from my session?
This workflow uses an external clipping editor after Justpushrecord delivers recording files through Google Drive. Do not treat studio recording or file delivery as automatic social clip generation.
Can I generate clips directly from a Google Drive link?
You can use a Drive link only when the chosen editor supports that import method and can access the file. Otherwise, download the recording and upload the local copy without making the source public.
What aspect ratio should I use for vertical podcast clips?
Use a 9:16 aspect ratio for a standard portrait clip. Confirm the destination's current upload requirements and inspect the crop before exporting.
Is automatic clipping better than choosing excerpts manually?
Automatic clipping is better for generating a first set of candidates; manual selection gives you direct control over exact passages. Both routes need a review for context, captions, and framing.
Can I automatically publish every generated clip?
Keep generated clips unpublished until someone approves them. Automatic selection does not establish guest consent, factual accuracy, or suitability for a standalone post.
What happens to social clips when I revise the full episode?
Existing clips need a separate check against the revised episode. Regenerate affected excerpts, mark older exports as superseded, and deliberately replace affected scheduled posts.
One last thing
Review the clip without the episode title beside it. If you cannot identify the subject from the spoken excerpt, your audience lacks that context too. Fix the opening before adding a headline; a caption cannot repair a misleading cut.